April 21, 2017

Watercolor Card + Neat and Tangled

Hey there, Nancy here today with another look at the Cottontail Cuties stamp set. I created bunches of Easter cards this holiday season and this one was a favorite.


I started the design by watercoloring a few circles in coral and yellow. For the largest circle, I stamped the "cottontail cuties" text repeated with very light gray ink. A few of the circles were framed using cardstock and a circle die while the coral ones were placed floating off the side of the card.

To finish off the card a sentiment I used the Celebrate die and cut it out of white cardstock several times for a textured effect. The bunny from the Cottontail Cuties was colored with Copics and popped up with foam tape. A sprinkle of tiny clear sequins finishes off the card.

Thanks so much for stopping by today!


April 19, 2017

Bella Blvd Guest Designer Projects

I recently had the opportunity to guest design for Bella Blvd. I love this company with it's bold colors and cute icons. Once upon a time I was on the design team and I loved every minute of that time. I can always count on them for some of the best color palettes and embellishments.

Here's a peek at some of the layouts I designed for Bella. For more info and photos, visit the Bella Blvd blog here.


This is the Barnyard Collection with it's cute cow print and pops of yellow. I love the rubber charms in this collection.


Next up is Secrets of the Sea and it goes straight to my navy and white loving heart. This is nautical done perfectly! My favorite in this collection is the waves washi tape and puffer fish stickers.


Last up is the Popsicles and Pandas collection which was my favorite to work with. I love that I can use it for any theme since it's all about beautiful patterns and colors. My favorite here is definitely the paper - all of it!

Thanks so much for stopping by today. I've been creating like mad this spring and I'll have lots to share coming soon!

Creative Backgrounds + Felicity Jane

Hello pretty little kit. That's what I think every month when I open the striped black and white box of Felicity Jane goodness. These are some beautifully designed kits and I look forward to getting them every month.
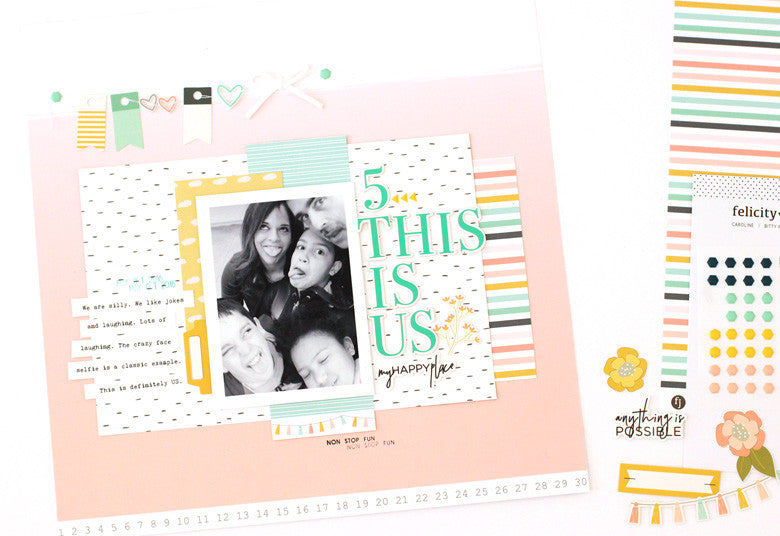
Today's challenge was to make a creative background and somehow combine it with this photo of my son snorkeling in the Bahamas. I pushed it around for a while when I thought "bubbles" - and that's where the idea for the circle background started. 
Bloop by @nancydamiano | @felicityjane
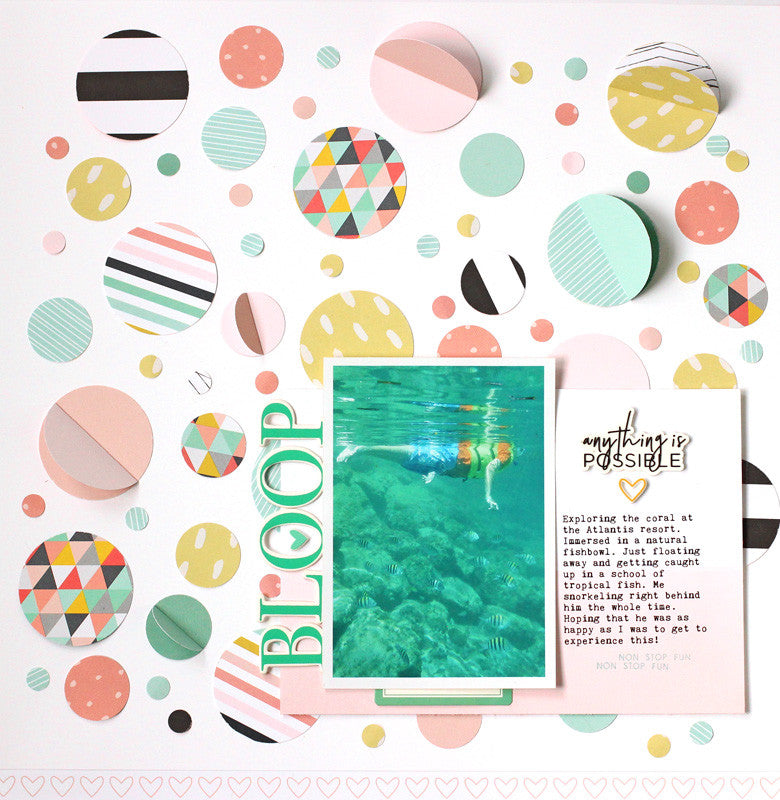
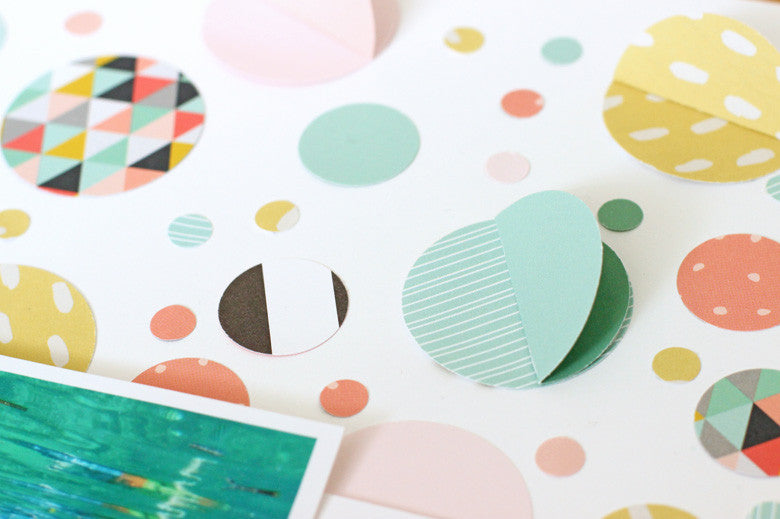
I used an electronic die cutting machine to cut out circles in 1-3/4", 3/4" and 1/4" sizes. I think I used just about every single patterned in the Caroline kit. I love it that much! By scattering them through the design, there is plenty of color and movement - perfect for my underwater story.
Bloop by @nancydamiano | @felicityjane
To give the circles a little lift (and interest), I cut out an extra circle. Next I folded it in half and adhere just one side to an existing circle on the layout. Fluff a bit, and you have a floating 3-D bubble. I love how the shape and texture ties in to my snorkeling theme.
Bloop by @nancydamiano | @felicityjane
To ground the photo, I used a pink and white patterned paper from the kit. I love how subtle this design is. Perfect for allowing my journaling to shine through. A rubber charm title and heart draw the eye to the words. I tucked the title "BLOOP" just under the photo vertically to really highlight the area. I want the eye to always go back to my photo, despite the beautiful background! 
Bloop by @nancydamiano | @felicityjane
Creating unique backgrounds is a fun way to get creative and tell a story. The Caroline kit is super versatile. I love that I was able to add my own theme and background. Bloop!

April 13, 2017

Video: Designing with Stars | Studio Calico

Hey there, we're getting ready to celebrate Easter this weekend. It will be house full of kids and family dinners for us. I've been creating like mad lately so I can take a nice creative break this week. I'm looking forward to it.


This is the latest video I made using Studio Calico's Written in the Stars kit. I love the vellum stars in the kit and that's what I focused on in this layout.


Take a look at the video to see how to create movement with shapes:


Thanks so much for watching. I hope this gives you a spark of an idea to create some star magic. If you do, please post it in the Studio Calico gallery and tag me. I'd love to see your spin!

Happy Easter to you and yours. I'll see you next week.

April 12, 2017

Tiny Banner Love + Felicity Jane Caroline Kit

I've been working with some beautiful things lately. First up, let's take a look at the  in the new Felicity Jane May Caroline kit today. I love this color scheme. Actually, I've loved just about all of the FJ color schemes. They are soft, pretty and feminine, but not so overly feminine that I can't use them for my everyday layouts (including the boys).

This is Us by @nancydamiano | @felicityjane

I tried my hand at a banner that was a little 'different'. Banners were a trend that blew up a few years ago. I challenged myself to do take another spin on them. 
This is Us by @nancydamiano | @felicityjane
I try to think of products 'outside of the box' that they were intended! For example, the rubber charm hearts in this month's kit. That opening in the center makes them perfect to string along my banner. The add that unexpected design element that makes layouts pop. To anchor the banner, use two puffy hexagon shapes with a punch of color. And to add a dainty something, you can't go wrong with a suede bow.
This is Us by @nancydamiano | @felicityjane
The title is a smash up of my favorite things in the Caroline kit. I started with that bold aqua alpha and worked from there. For contrast, the script silicone charm was perfect. And for pops of color, the yellow flower die cut and puffy arrows were perfect. The stacked title balances out the photo, paper layers and the banner.
Create banners with your favorite bits and pieces to decorate your stories!