
This is my blast from the past blog post. Old project that I forgot to post here. I like to spend most of my time making and dreaming up new ideas. So much so that sometimes I forget to share!
You can see the influence of Pinterest here and the absence of color in all it's stark glory. I pin a lot of craft rooms that are clean + trendy and very, very white. I translated this aesthetic to a layout. I like color too much for this to stick, but it was nice to branch out and do something different.
[detail]
The whimsical Thickers font here are perfect for creating a journaled background that looks like handwriting. I love how the photo pops off the page even though there is not a speck of space left empty.
[photo detail]
I remember taking this photo and thinking that my son was getting so big. I wondered if this was the last 'flying with Daddy' shot that I would get. We rarely know when it's going to be the 'last' of anything and I'm glad that I captured this moment. Flying over Tomorrowland has always been one of his favorites.
[Yessi]
My niece in her face painted glory. This little one is all girl and will pick leopard and sparkle every time. The feathers, dreamcatcher and purple in this Simple Stories collection worked with the bold photo and represent her at this age.
[detail]
Showing posts with label Disney. Show all posts
Showing posts with label Disney. Show all posts
October 2, 2019
October 5, 2017
Magical Goodness + Studio Calico's Starlight
I love all things Disney. That's pretty obvious if you take a closer look around here. It's a place that we travel to almost every year and I have so many photos and memories from this magical place. I love that Studio Calico's Starlight kit was perfect for some of those stories. Let me share a few.


This one from Disney California. And yes, I realize I misspelled California - a nice little dose of humility for this spelling snob is what that is. Unfortunately, it was all filmed and posted before I noticed so it's here to stay! As a consolation, there is a video on how it all came together (misspelling and all):
Next, we have a project life page with some Magic Kingdom photos that I love from a few years ago:

And then there's this one from Disney's Typhoon Lagoon park. My favorite waterpark of all time!

And then there's this little oddball. I used the Fall Document add on to document these photos from the pumpkin patch last year. I have to get in at least a little bit of the current season in there!

These were all my project for the Studio Calico gallery this month. Mostly magical, with a side of fall goodness! Thanks for stopping by.
September 13, 2017
Scrapbook Process Video: Stamping & Scrapbooks
I've been filming some process videos again and I started with the Studio Calico Starlight Kit and stamps this time around. I started out with a photo from Disneyland (naturally!) and some of my favorite patterns from this month's kit to create an interesting, colorful layout that's fun and easy to make.


I used a sprinkle of buttons and strong shapes to create movement. That and a few tips on how to bring more stamping into your scrapbook layouts. Take a look at how the layout came together in the video below.
Tips & Tricks:
- For a quick and easy way to get all of your stamped text centered perfectly, remember to stamp first, then glue. It's much easier to center your paper elements around a pre-stamped image or sentiment.
- Emphasize the repetition of shape in your design. Nothing adds more fun to a layout than a burst of floating circles. Emphasize the circular design with alphabet stickers, buttons, or sequins.
- Add a final layer of texture to your layouts with a sprinkling of buttons, sequins, or enamel shapes. The final touch is an important one!

Creating colorful pages with textured elements is a fun way to tell a story! Thanks so much for stopping by and watching today. Now go break out your "Starlight" Kit and get to creating!

January 17, 2017
Disney + Felicity Jane
The minute I opened the new Felicity Jane Sophie kit, my first thought was 'candy'! This color palette of pink, yellow, aqua and a dash of navy is one of my favorites. It reminded me so much of all the Disneyland pictures that I had waiting to be scrapbooked.

I chose this favorite photo of the castle and sketched out an idea that would really highlight the magical theme. The floating stars were inspired by the puffy stars in the kit. I needed a place to ground them and using large stitched stars was just that spot.

The pretty stars is where the idea started. By making one larger star and using the kit stamp to personalize it, a custom embellishment was created. It lends weight to the upper left hand corner of the layout, balancing all of the elements.

The rubber charm "sweet" adds a nice dash of pink color to all the white in the center. It's also as a grounding spot for my story. To create a layered title that pops, I like to combine a script font with a bold one.

The Sophie kit is chock full of beautiful embellishments, a sweet color palette and an entire sheet of 12x12 cut aparts. Everything that you need to tell your beautiful little stories!
I chose this favorite photo of the castle and sketched out an idea that would really highlight the magical theme. The floating stars were inspired by the puffy stars in the kit. I needed a place to ground them and using large stitched stars was just that spot.
The pretty stars is where the idea started. By making one larger star and using the kit stamp to personalize it, a custom embellishment was created. It lends weight to the upper left hand corner of the layout, balancing all of the elements.
The rubber charm "sweet" adds a nice dash of pink color to all the white in the center. It's also as a grounding spot for my story. To create a layered title that pops, I like to combine a script font with a bold one.
The Sophie kit is chock full of beautiful embellishments, a sweet color palette and an entire sheet of 12x12 cut aparts. Everything that you need to tell your beautiful little stories!
November 4, 2016
Documenting Disney: The Short and Sweet Version
Vacation mini books are one of my favorite projects to make. Sometimes the smaller the better. Little snapshots and details of a trip that bring all the memories back - I love them! I kept this one clean and simple like I tend to do.
If you'd like to see a more detailed look, check out my Instagram account today and I will be posting a flip through video.


2. Mark Time. I was standing around Main Street waiting for my family, drinking a latte and soaking up the magic. When I looked up I noticed that smack in front of me was this clock that I hadn't noticed before. Perfect for documenting the start of our day! In all of our trips to Disney, I don't think I've ever taken this shot. Remembering to mark time is a great way to start a mini!
Don't forget to add small details, even when you're creating a simple project. That little puffy heart in the center of the letter "o" gives this title a spark of special.


5. Ride it Again. Don't forget to highlight favorites - foods, attractions, shows. I remember a time when my son was so in love with the Peter Pan story that he actually thought he was the real Peter Pan. This attraction will be my favorite because of that special memory. There's always a crowd here, so I focused my shot on the sign and icons cutting out all of the visual clutter.
Use rotary stamps to add text to die cut shapes like this pretty feather. To add even more detail, use gold stickers for an accent.

6. Sweet Endings. End the story with a highlight or exactly how you began like I've done here. I remembered to go back to that exact spot we started and marked just how long and full that day was! Maybe it was dinner, a parade or fireworks for you - whatever the memory, remember to document and take a detail photo.

Capturing a Disney vacation can be a monumental task, almost a chore. Keep it short and sweet by creating a mini of highlights until you can really dig in and tell the full story.
This is the type of project that keeps me motivated! Keeping the colors and embellishments to a minimum let those photos and memories shine.
SUPPLIES | Click on the photos for more info:


If you'd like to see a more detailed look, check out my Instagram account today and I will be posting a flip through video.

To create this cover I printed out a free Mickey Mouse head clip art image onto white paper. I used that to make a template and cut the shape out of the gold star transparency. I kept the colors to gold and white, keeping the embellishments to a minimum. I like this stark design with a subtle nod to the Disney theme. It keeps things simple.
Let's get started on connecting the dots of the story!
1. Take the Iconic Shot. Let's start the story out right with an iconic photo of the castle. Once we see that castle, we know our vacation has really started! This page is monogrammed with my boy's initial in a gold and white Thicker and a gold heart flair. A date stamp and some simple sewing finish it off.

2. Mark Time. I was standing around Main Street waiting for my family, drinking a latte and soaking up the magic. When I looked up I noticed that smack in front of me was this clock that I hadn't noticed before. Perfect for documenting the start of our day! In all of our trips to Disney, I don't think I've ever taken this shot. Remembering to mark time is a great way to start a mini!
Don't forget to add small details, even when you're creating a simple project. That little puffy heart in the center of the letter "o" gives this title a spark of special.

3. Sights, Sound, Smell. There are certain sounds and smells that can bring you right back to this place and time. Focus on what that is for you and document it. Our family always visits the Confectionary on Main Street, oftentimes more than once. There is an overwhelmingly sweet, buttery baking goodness that just oozes out of this storefront. My mouth waters just looking at the photo.
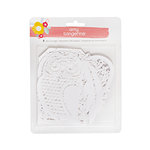
Intricate die cuts make a great spot for adhering photos to a mini album. They add so much detail and still give a peek at what's coming next.

4. Focus on the Details. Take a close up shot of an iconic shape that reminds you of the park. It can be anything from rows and rows of stuffed animals, a carousel of Mickey ears, or bunches of balloons. Zone in on that one image that speaks to you! Intricate die

Use rotary stamps to add text to die cut shapes like this pretty feather. To add even more detail, use gold stickers for an accent.

6. Sweet Endings. End the story with a highlight or exactly how you began like I've done here. I remembered to go back to that exact spot we started and marked just how long and full that day was! Maybe it was dinner, a parade or fireworks for you - whatever the memory, remember to document and take a detail photo.

Capturing a Disney vacation can be a monumental task, almost a chore. Keep it short and sweet by creating a mini of highlights until you can really dig in and tell the full story.

This is the type of project that keeps me motivated! Keeping the colors and embellishments to a minimum let those photos and memories shine.
SUPPLIES | Click on the photos for more info:
December 1, 2015
Thankful + Hip Kit Club
I've been working and creating and moving my scrap space this month. Reflecting on what I'm grateful for and using up the beautiful warm October Hip Kit.
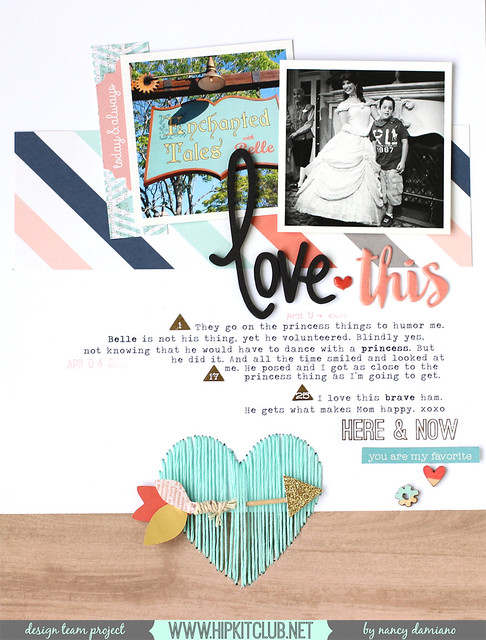
Love this photo and memory of my boy and his turn at dancing with a princess. He did it because he knew it would make me happy, and that means everything. It's one of those Disney moments that I tuck away for when he's grown.
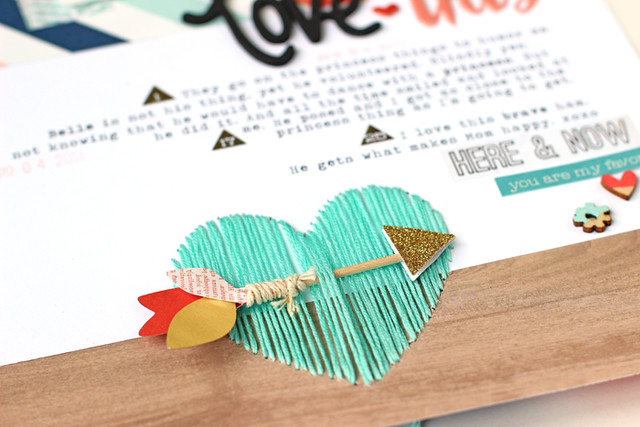
The design came from the title. I knew I wanted to do a heart, so why not make it a real focal point. Stitching it in aqua blue and placing it so that it marries the wood and white paper borders anchors the page. The arrow through the heart was a last minute addition. The heart was looking too bold, too solid and weaving the arrow softened it up and made it a little more interesting. My something different.
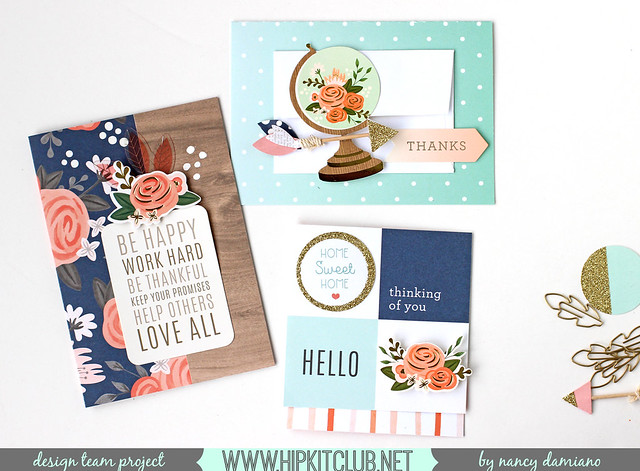
A trio of cards with some Pebbles paper and embellishments. It's nice to change things up and step away from making layouts. I like working on a smaller canvas and use up the bits and pieces that are leftover from my kits every month.
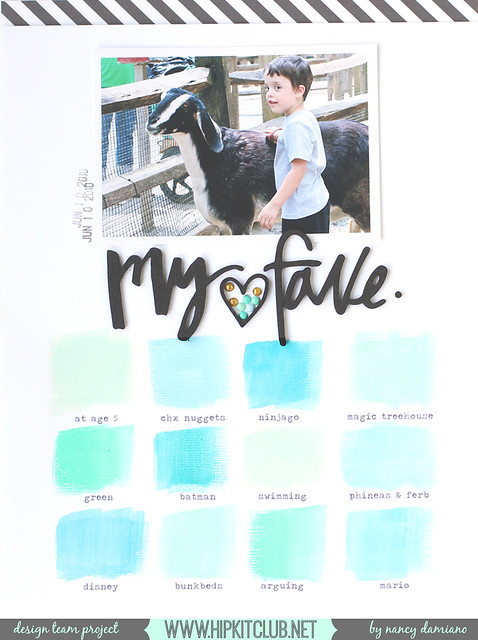
This was my artsy attempt at using the Prima Watercolor Pencils. Totally inspired by the many paint swatches that are up around my new scrap space. I used a typewriter to get the words to fit just right. This design is clean and simple. The idea of the paint swatch and enamel dots in the heart are the something different here.
SUPPLIES: October Hip Kit | Pebbles Collection | Prima Watercolors | Script Titles | Wood Arrows | White Cardstock
Love this photo and memory of my boy and his turn at dancing with a princess. He did it because he knew it would make me happy, and that means everything. It's one of those Disney moments that I tuck away for when he's grown.
The design came from the title. I knew I wanted to do a heart, so why not make it a real focal point. Stitching it in aqua blue and placing it so that it marries the wood and white paper borders anchors the page. The arrow through the heart was a last minute addition. The heart was looking too bold, too solid and weaving the arrow softened it up and made it a little more interesting. My something different.
A trio of cards with some Pebbles paper and embellishments. It's nice to change things up and step away from making layouts. I like working on a smaller canvas and use up the bits and pieces that are leftover from my kits every month.
This was my artsy attempt at using the Prima Watercolor Pencils. Totally inspired by the many paint swatches that are up around my new scrap space. I used a typewriter to get the words to fit just right. This design is clean and simple. The idea of the paint swatch and enamel dots in the heart are the something different here.
SUPPLIES: October Hip Kit | Pebbles Collection | Prima Watercolors | Script Titles | Wood Arrows | White Cardstock
September 25, 2015
Pinkfresh + Enamel Accents
I love a good, bold statement piece. This veneer heart and enamel heart set by Pinkfresh reminds me of one of those bubble necklaces I could never wear. My neck may be too short to pull the look off, but maybe on paper I could pull it off.

The quadrant design is simple, but I think that the diagonal background keeps it from being too plain. The large wood heart embellishment is balanced out with two 4x4 photos from Disneyland.

A favorite quote from Walt Disney - "Laughter is timeless. Imagination has no age. And dreams are forever" is the journaling starter. I think it wraps up the magic behind the place in just a few short sentences and is the reason why behind the page. We want them to hold to on that part of childhood for as long as we have.
SUPPLIES | Amy Tangerine Paper | Wide Format Printer | White Linen Cardstock | Scraptastic Janglin' Kit

The quadrant design is simple, but I think that the diagonal background keeps it from being too plain. The large wood heart embellishment is balanced out with two 4x4 photos from Disneyland.
A favorite quote from Walt Disney - "Laughter is timeless. Imagination has no age. And dreams are forever" is the journaling starter. I think it wraps up the magic behind the place in just a few short sentences and is the reason why behind the page. We want them to hold to on that part of childhood for as long as we have.
SUPPLIES | Amy Tangerine Paper | Wide Format Printer | White Linen Cardstock | Scraptastic Janglin' Kit
July 27, 2015
Maggie Holmes Confetti + Disneyland

COLLECTION | Maggie Holmes Confetti + Crate Paper Craft Market
STORY | This family selfie was taken right at the start of our first day at Disneyland. I wanted to remember this perfectly happy moment. Because anyone who has traveled with three kids under 8, knows these moments are fleeting and rare. I wanted to capture that feeling of being excited to get our vacation started – but still stay true to the reality of families and vacations.
DESIGN | Confetti and Craft Market are a match made in scrapbook heaven. They both have a nice soft feel and neutral patterns that are great for any story you want to tell.
I started the design with a base of patterned paper. I loved this paper so much, I wanted to use it all! I chose my favorite patterns and layered them in a cluster right in the center. To give the photo a little lift, I placed a chipboard frame just underneath. Adding some chipboard to the edges of the frame adds a punch of color and shape to the space.
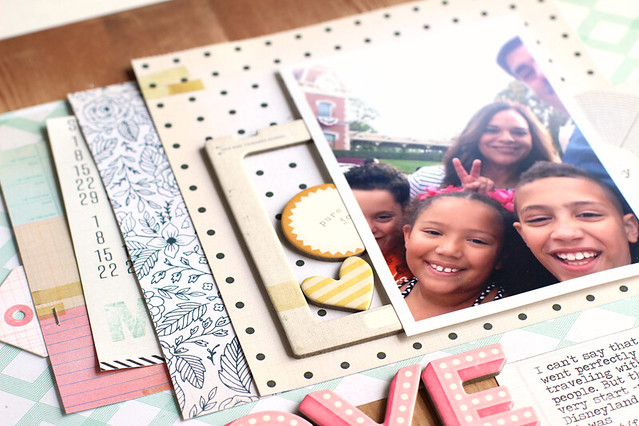
I love how the bright pink LOVE title stands out from the softer feel of the background. It adds just the right amount of pop to the center of the design.
The final touches include a little diagonal smattering of flair and wood pieces that ground the journaling space.
This was fun to create + a real story I want to remember.
This was fun to create + a real story I want to remember.
SUPPLIES | Patterned Paper: (Maggie Holmes, Confetti, 6×6 paper pad) (Maggie Holmes, Confetti, Jubilee) (Maggie Holmes, Confetti, Snapshot) (Crate Paper, Craft Market, 6×6 Paper Pad) (Crate Paper, Craft Market, Studio Paper) Embellishments: (Crate Paper, Craft Market, 12×12 Chipboard) (Crate Paper, Craft Market, Wood Veneer) (My Mind’s Eye, On Trend, Flair)
March 25, 2015
Disneyland Carsland Opener

STORY | This will be the first page of my Disneyland album this year. It's the reason we went after all. The kids picked California because they wanted to visit Carsland. It's one of the handful of photos that we have of our group and is perfect for telling this story.
DESIGN | I kept this design pretty straightforward and simple. I started with the bold polka dot print to ground the large, bold photo. I placed the photo right where the pattern meets the white card stock. This is a major focal point and it's where your eye goes immediately!
The target card in a pretty, contrasting teal color repeats the circle shape and balances out the photo. The large white star fades into the background and adds some shape and texture to the white area. The bold black and white word bubble stickers point right to the journaling - so the story doesn't get lost.
KIT | Counting Stars Kit by Scraptastic (February 2015)
March 20, 2015
A Disney Class + Magic Memory Keepers Podcast

Blogging and chatting today about some of my favorite subjects - Disney and Scrapbooking! I sat down with Tracie Claiborne of Magic Memory Keepers and we talked about how to document trips to the Happiest Place on Earth. I hope that you'll listen and let me know what you think!

To listen to the podcast click here or look for it on your iTunes app.
What seems like a lifetime ago, I taught a Scrapbooking Family Vacation class at the now closed Two Peas in a Bucket. One of my favorite lessons in that class was a chapter dedicated to Disney scrapbooking. Unfortunately, the video is no longer available but everything I created with ideas and notes is included in a PDF that you can download here Happy Disney scrapping!

As I was preparing for the interview and this post, I came across some of my favorite Disney pages. I thought I'd share those here as well:


Subscribe to:
Comments (Atom)


